A ship spends its whole life being pushed over and standing back up. Every wave on the beam, every gust on the topsides, every turn of the wheel heels her a few degrees, and what brings her back upright is not the engine or the helmsman but a quiet contest between two forces, her weight pressing down and the sea’s buoyancy pushing up.
Get the balance of those forces right and she shrugs off a knockdown and rights herself. Get it wrong, by loading her badly, by slack tanks, by a shifted cargo, and the same sea that she rode out yesterday can roll her past the point of return. Stability is the science of that contest, and the reassuring part is that the core of it is geometry, not heavy mathematics.
The Four Points That Decide Everything
Transverse stability comes down to the relationship between four points, all imagined on the ship’s centreline and all measured up from the keel.
The keel (K) is simply the reference datum at the bottom of the hull, the line everything else is measured from. The center of gravity (G) is where the ship’s entire weight is taken to act vertically downward. It rises when weight goes high and falls when weight goes low, and crucially it moves only when weight itself moves, never on its own. The center of buoyancy (B) is where the upward push of the displaced water is taken to act, at the centroid of the underwater shape. Unlike G, B shifts the moment the ship heels, because the immersed shape changes and its center moves toward the low side. The metacenter (M) is the cleverest of the four: as the ship heels through a small angle, the vertical line of buoyant force traces upward and crosses the centreline at a point that stays almost fixed, and that point is M, the effective pivot the ship rocks about.
GM and GZ: The Two Numbers Worth Knowing
From those four points come the two measures every watch officer should understand. The first is metacentric height (GM), the vertical distance between G and M, found simply as KM minus KG. When G sits below M, GM is positive and the ship is stable; that gap is the headroom her stability lives in. The second appears only when she heels. Once she is over at an angle, the weight acting down through G and the buoyancy acting up through B are no longer in line, and the horizontal distance between those two parallel forces is the righting lever (GZ). Multiply GZ by the ship’s displacement and you have the righting moment, the actual turning effort hauling her back upright.
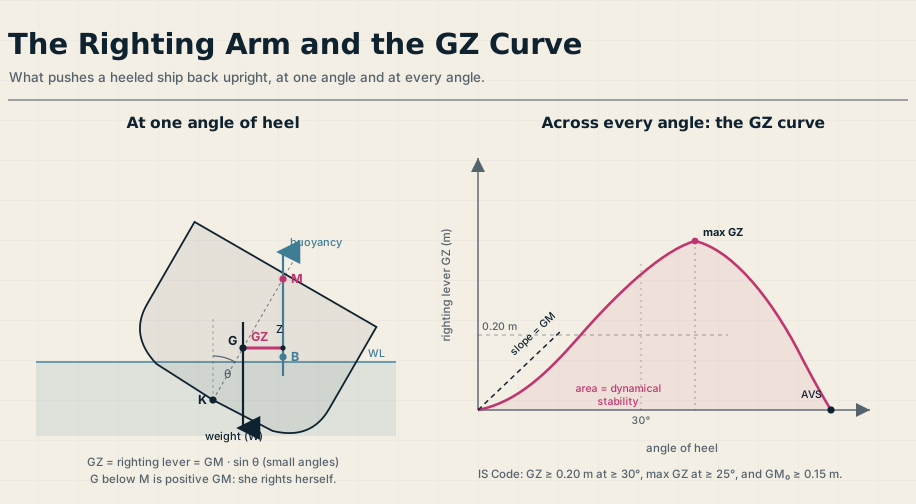
The two are tied together neatly. At small angles, GZ is just GM multiplied by the sine of the heel angle, which means GM is the slope of the righting lever as the ship first leans, the measure of her initial stability. It is a fine guide for the first few degrees and a misleading one beyond them, because M only stays put at small angles. To see what happens when a wave lays her over to thirty or forty degrees, you need not a single number but the whole curve.
The GZ Curve: Stability at Every Angle
Plot the righting lever GZ against the angle of heel and you get the curve of statical stability, the single most important picture in the subject. It starts at zero, rises with an initial slope equal to GM, climbs to a maximum righting arm at some angle of heel, then falls away to cross zero again at the angle of vanishing stability. Past that angle the lever goes negative: buoyancy and weight now combine to capsize her rather than right her. The area under the curve represents the energy the ship can absorb before she goes over, her dynamical stability, which is why a curve that is merely positive is not enough; it has to be positive by the right margin over the right range of angles.
This is where regulation meets the sea. The IMO Intact Stability Code sets minimum criteria a ship’s loaded condition must satisfy before she sails: an initial GM of at least 0.15 m, a righting lever of at least 0.20 m at a heel of 30 degrees or more, a maximum that occurs preferably beyond 30 degrees and never below 25, and specified minimum areas under the curve out to 30 and 40 degrees. A ship can have a comfortably positive GM and still fail these, which is exactly why the loading is checked against the full curve in the stability booklet or loading computer before departure, not judged by GM alone.
Stiff or Tender: Living With Your GM
A bigger GM is not simply better, and this is where stability stops being abstract and starts being something you feel underfoot. A large GM makes a stiff ship: a powerful righting moment that snaps her back hard and fast, with a short, jerky roll that throws the crew about, strains the structure, and works cargo lashings loose. A small GM makes a tender ship: a long, slow, easy roll that is comfortable and gentle but sluggish to return, with little reserve in hand if anything erodes her stability further. Every ship has a sensible band between the two.
You can even feel the GM through the roll. The time a ship takes to roll from side to side and back lengthens as GM shrinks, so a long, lazy roll period is the sea telling you the ship is tender, and a short, snappy one says she is stiff. Watchkeepers learn to read that signal, because a roll period that suddenly grows longer over a watch is a warning that stability is being lost, perhaps to slack tanks or water trapped on deck.
When Stability Goes Wrong: List, Loll, and Free Surface
Two faults are easy to confuse and dangerous to treat alike. A list is a steady lean caused by weight loaded off the centreline, so that G sits to one side; the ship is still stable, just unbalanced, and the cure is to move or add weight to bring G back to the centreline. A loll looks similar but is something far worse: it is caused by negative GM, G having risen above M, so the ship has no stability in the upright position and flops over to an angle where she finds an uneasy balance, ready to lurch to the other side just as readily. The fatal mistake is to treat a loll like a list and add weight to the high side, which can roll her right over. A loll is corrected by lowering G, adding ballast low or removing weight from aloft, never by fighting the lean directly.
Lurking behind many of these troubles is the free surface effect. A tank that is slack, neither full nor empty, lets its liquid surge to the low side as the ship heels, shifting weight downhill exactly when she is trying to right herself and causing a virtual rise of G that eats into GM. The loss grows with the cube of the tank’s width, so a single wide slack tank is far more damaging than a narrow one, which is why tanks are subdivided and why pressing tanks up or running them dry is a constant habit of good practice. The same effect turns floodwater loose in a hull into a grave danger, the link between everyday stability and flooding and damage control.
Why It Belongs to the Whole Crew
Stability is settled before the lines are let go, in the loading plan and the pre-departure calculation, but it does not stay settled. Fuel and water burn off, ballast is adjusted, cargo is worked, and the numbers drift through the voyage, which is why the condition is recalculated whenever the loading changes materially. And it is not only the chief officer’s concern. The cadet who notices the roll period lengthening, the rating who stows heavy stores low and secures them, the officer who keeps a slack tank from being left slack, each is protecting the same margin. Understanding the four points and the curve they produce turns those habits from rules to be obeyed into a picture to be read, and a crew who can read it is a great deal harder for the sea to surprise. It is foundational seamanship, and it underpins how a ship behaves when she has to maneuver in heavy weather.
Frequently Asked Questions
These are the questions cadets and watchkeepers ask most about ship stability, from what GM really means to why a tender ship can be dangerous. Here are the short answers.
What is the difference between GM and GZ?
GM, the metacentric height, is the vertical distance between the center of gravity (G) and the metacenter (M), and it measures a ship’s initial stability at small angles. GZ, the righting lever, is the horizontal distance between the weight and buoyancy forces when the ship is heeled, and it measures the actual righting effort at that angle. At small angles GZ equals GM times the sine of the heel.
Is a higher GM always safer?
No. A large GM makes a ship stiff, with a strong but violent, jerky roll that stresses the structure and can shift cargo and injure crew. A small GM makes her tender, comfortable but sluggish to right and with little reserve. Each ship has a safe band between the two, and the loading is checked against the full GZ curve, not GM alone.
What is the difference between a list and a loll?
A list is a steady lean from weight loaded off the centreline; the ship is still stable and is corrected by rebalancing the weight. A loll is a lean caused by negative GM, where G has risen above M and the ship has no upright stability. A loll is corrected by lowering G, and adding weight to the high side to “level” it can capsize the ship.
What is the free surface effect?
It is the loss of stability caused by liquid moving freely in a slack tank. As the ship heels, the liquid surges to the low side, shifting weight downhill and causing a virtual rise of the center of gravity that reduces GM. The loss grows with the cube of the tank’s width, which is why tanks are subdivided and kept either pressed full or empty.
What does the IMO Intact Stability Code require?
Among its general criteria, a ship’s loaded condition must have an initial GM of at least 0.15 m, a righting lever of at least 0.20 m at a heel of 30 degrees or more, a maximum righting arm preferably beyond 30 degrees and not below 25, and minimum areas under the GZ curve out to 30 and 40 degrees. The loading is verified against these before the ship sails.