Buoys and Markers: How to Read the IALA Buoyage System
Learn how to identify and understand buoys and markers, including lateral marks, cardinal marks, danger marks, and navigation aids essential for safe seamanship.
Every cadet learns “red, right, returning” before they ever stand a watch, and in half the world that rule will set you neatly onto the rocks. The phrase is sound seamanship in New York or Yokohama and quietly wrong in Rotterdam or Singapore, because the floating marks that edge a channel do not mean the same thing everywhere. A buoy is a sentence in a language with two dialects, and the first job on any bridge is knowing which dialect you are reading.
That language is the IALA Maritime Buoyage System, the worldwide convention for the buoys, beacons, and marks that tell you where the channel runs, what to avoid, and which way safe water lies. IALA, now the International Organization for Marine Aids to Navigation, became an intergovernmental body in August 2024, but the system it maintains has been near-universal since 1980. Learn it once and you can read the edge of any channel on earth. Mistake the region you are in, and the most basic mark on the water will lie to you.
At a Glance
One System, Two Regions
The reason “red, right, returning” travels badly is that IALA never managed to agree on a single set of colors. The compromise was two regions that share everything except the colors of their lateral marks. Region B covers the Americas from Canada to Cape Horn, plus Japan, Korea, and the Philippines, and there red marks are kept to starboard when you return from seaward. Region A covers the rest of the world, the whole of Europe, Africa, the Gulf, India, and Australasia among it, and there the colors are reversed: red marks are kept to port on the way in. Everything else, the cardinal marks, the danger marks, the safe water marks, the special marks, is identical in both regions. Only the lateral colors flip.
What both regions need before any of this makes sense is a direction of buoyage, because port and starboard only mean something once you know which way you are supposed to be heading. As a rule the direction runs from seaward toward a harbor, river, or estuary, and in open coastal waters it is set by the local authority, usually running clockwise around a landmass. You do not guess it. The chart prints it as a distinct arrow symbol, and reading it correctly is part of the same discipline that goes into reading any nautical chart before you commit the ship to a channel. Get the direction of buoyage backward and you will dutifully follow the marks straight out of the navigable water.
Lateral Marks: The Edges of the Channel
Lateral marks are the workhorses, the marks that line a channel and tell you which side to leave them. Their shapes are fixed worldwide and never change between regions, which is your safety net when the light has gone or the paint has faded. A port-hand mark is can-shaped, a flat-topped cylinder, and where it carries a topmark that topmark is a single can. A starboard-hand mark is conical, pointed at the top, and its topmark is a single cone, point upward. Commit the shapes to memory and you are never wholly dependent on color, which matters at dusk, in haze, or when a buoy is so streaked with rust you can barely tell red from green.
The colors are where the two regions part company, and the diagram below lays the difference out side by side. In Region A the port-hand mark is red and the starboard-hand mark is green. In Region B that reverses: port is green, starboard is red, which is where the American “red, right, returning” comes from. The lights follow the colors, red light on the red mark, green on the green, shown in any rhythm except one. That one exception is the composite group flashing rhythm, a pattern of two flashes plus one, which is reserved for preferred channel marks. Where a channel divides, a preferred channel mark is a lateral mark of one color carrying a single broad band of the other, telling you which side is the main route while leaving the secondary channel open.
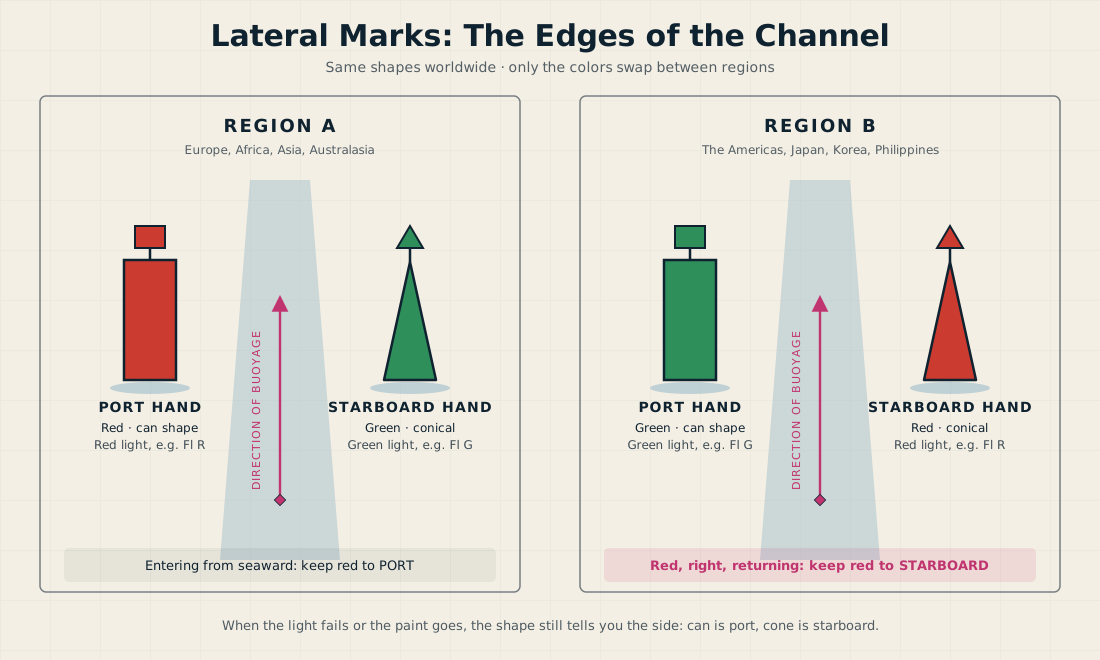
The thing to hold onto is that a lateral mark is a relative instruction, not an absolute one. It only tells you “keep me on this side” with respect to the direction of buoyage. The moment you turn and run the channel the other way, the same buoy you left to port you now leave to starboard. Crews who think of buoys as left and right rather than as port-hand and starboard-hand relative to the buoyage direction are the ones who get caught out on the way back.
Cardinal Marks: Where the Danger Is and Where to Pass
Where a lateral mark edges a channel, a cardinal mark points at a specific danger and tells you which side of it holds clear water. The four marks are named for the cardinal points, and the rule is as blunt as the name: pass to the north of a north mark, to the east of an east mark, and so on. There is no region to remember and no direction of buoyage to apply. A cardinal mark means the same thing in every ocean.
Every cardinal mark is painted black and yellow, carries a topmark of two black cones, and shows a white light. The genius of the system is that the topmark and the colors encode the same information twice, so you can read a cardinal mark by day from its cones and confirm it by night from its light. The diagram below sets out all four around a single danger, but the logic is worth carrying in your head without it. The two cones point toward the black part of the buoy: north cones point up, so the black band is on top; south cones point down, so the black is at the bottom; east cones point apart at top and bottom, so the black is top and bottom; west cones point together in the middle, so the black is a band in the middle. The old hands remember east as an egg shape and west as a wineglass, and it works.
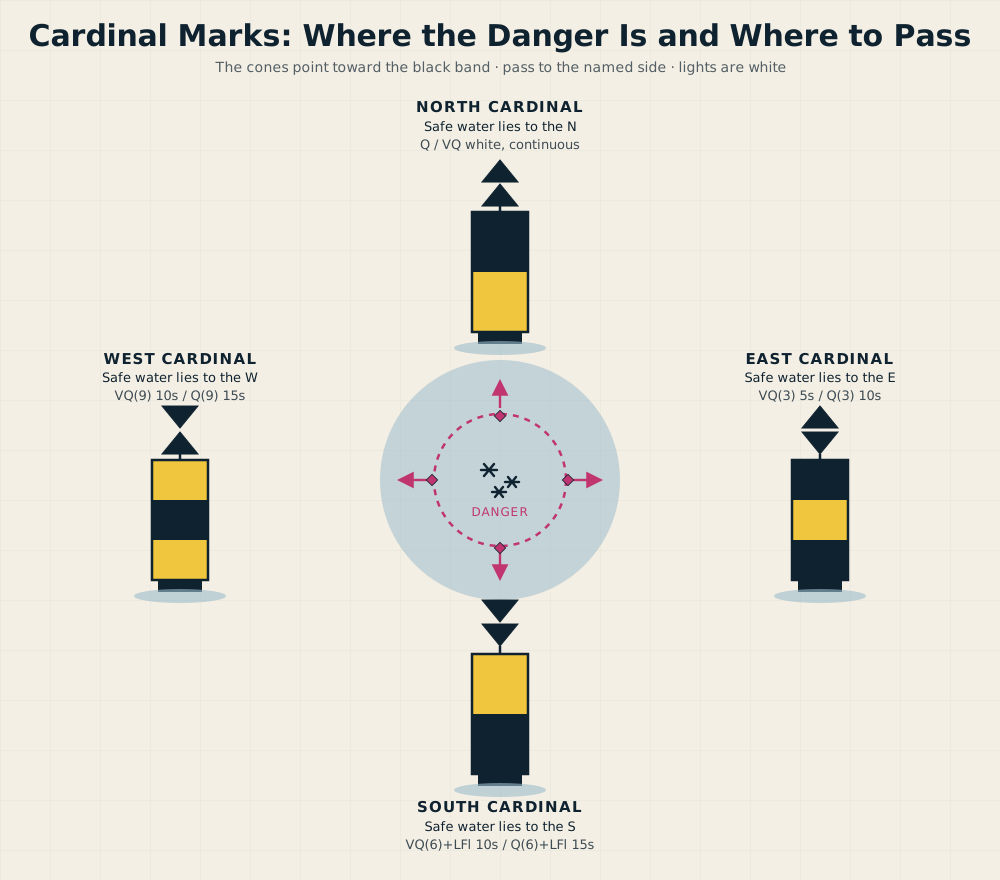
The lights count up like a clock face, which is the cleanest way to remember them. North is continuous, a quick or very quick flash that never stops, at twelve o’clock. East flashes in groups of three, at three o’clock. South flashes in groups of six, at six o’clock, followed by a single long flash so that you cannot mistake a hurried count of six for a count of nine. West flashes in groups of nine, at nine o’clock. Once you see the clock, you will never confuse a south mark for a west mark again, and on a dark bridge that distinction can be the difference between deep water and a reef.
Isolated Danger, Safe Water, and Special Marks
Three more standard marks round out the everyday system, and each answers a different question. An isolated danger mark is stationed on or directly above a small obstruction, a wreck or a rock, that has navigable water all around it. It is black with one or more red horizontal bands, its topmark is two black spheres stacked vertically, and it shows a white light flashing in groups of two. The doubled spheres and doubled flashes are the memory hook, and they tell you that you may pass on any side as long as you give the mark itself a clear berth.
A safe water mark, by contrast, tells you that the water around it is good and that you are most likely in mid-channel or making a landfall. It is the only mark with red and white vertical stripes, it carries a single red spherical topmark, and its white light is slow and deliberate: isophase, occulting, a single long flash every ten seconds, or the Morse letter “A.” Where the isolated danger mark says avoid, the safe water mark says you have arrived. The last of the three, the special mark, is not really about navigation at all. Painted yellow with a yellow cross-shaped topmark and a yellow light, it flags something the chart wants you to notice, a spoil ground, a cable, a military exercise area, a data buoy, or the boundary of a recreation zone. When you see yellow, the instruction is not “pass here” but “go and read what the chart says this is.”
The Emergency Wreck Marking Buoy
The newest member of the system was bought at a high price. In December 2002 the car carrier Tricolor sank in the Dover Strait after a collision, and despite being marked it was struck twice more in the following days. The lesson was that a fresh wreck, not yet charted and surrounded by improvised marks, was a lethal gap in an otherwise complete system. The emergency wreck marking buoy was the answer, trialed from 2006 and formally adopted into the IALA system in 2010.
You will know it on sight, which is the entire point. It carries equal numbers of blue and yellow vertical stripes, a topmark in the shape of an upright yellow cross, and a light that alternates blue and yellow, a second of each, like nothing else on the water. It is deliberately conspicuous because it is temporary, deployed within hours of a wreck being discovered and removed once the wreck has been surveyed, charted, and marked by conventional means. If you ever see blue and yellow flashing in a channel that yesterday held nothing, treat it as the warning it is and keep well clear.
Why the Chart Always Wins
For all the precision built into the system, the most important habit a watchkeeper can hold is a healthy distrust of the marks themselves. Buoys drag in heavy weather and end up off station. Lights fail. Marks are lifted for maintenance or moved as a channel shifts, and the notice telling you so does not always reach the bridge before the buoy does. A buoy is an aid to navigation, not a fixed point of truth, and the discipline that keeps ships off the ground is to navigate by the chart and confirm with the marks, never the reverse. If a buoy and your charted position disagree, the answer is to slow down and resolve the conflict, not to follow the buoy and hope.
Electronics have added a useful layer and a new trap in equal measure. Many marks now broadcast their identity over AIS, and you will increasingly meet virtual aids to navigation that exist only as a symbol on the screen with no physical buoy in the water at all. That is genuinely useful over a new wreck or a shifting bank, but it means the absence of a buoy is no longer proof the danger is gone, and the presence of a symbol is no longer proof anything is floating there. Many marks also carry a racon that paints a coded character on your radar display, a quiet confirmation that the echo you see is the mark you expected. Used together with the eye and the chart, these tools sharpen the picture. Trusted in isolation, any one of them will eventually mislead you.
None of this replaces the rules of the road. Buoyage tells you where the channel lies and which side to take; what you do when you meet other traffic inside it is governed by the COLREGs, and the two work together. A mark shows you the edge of safe water. Good seamanship, and a steady habit of reading every mark against the chart in front of you, is what keeps the ship within it.
Frequently Asked Questions
What is the difference between IALA Region A and Region B? The two regions differ only in the colors of their lateral marks. In Region A, port-hand marks are red and starboard-hand marks are green. In Region B, the colors are reversed, with green to port and red to starboard. Region B covers the Americas, Japan, Korea, and the Philippines; Region A covers the rest of the world. Cardinal, isolated danger, safe water, and special marks are identical in both.
How do you remember the cardinal marks? Read the topmark and the light together. The two black cones point toward the black part of the buoy: up for north, down for south, apart for east, together for west. The white light counts up a clock face: north is continuous, east flashes in threes, south in sixes plus a long flash, and west in nines. You pass on the named side, so you keep north of a north mark.
What does a blue and yellow striped buoy mean? It is an emergency wreck marking buoy, used to mark a new wreck that is not yet shown on the chart. It has vertical blue and yellow stripes, an upright yellow cross as a topmark, and an alternating blue and yellow light. It is temporary and highly conspicuous, so treat it as a serious warning and give it a wide berth.
Should you navigate by buoys? No. Buoys are aids to navigation, not fixed marks, and they drag, fail, and get moved. The safe practice is to navigate by the chart and use buoys to confirm your position, never to navigate by a buoy and assume the chart is wrong. If a mark and your charted position disagree, slow down and resolve the conflict before going on.
What is the difference between a port-hand and a starboard-hand mark? Shape, first of all. A port-hand mark is can-shaped, a flat-topped cylinder, and a starboard-hand mark is conical, pointed at the top. These shapes never change between regions, so they are your most reliable cue when color is hard to judge. Which side you leave them on depends on the direction of buoyage, not on left and right, so the same mark reverses its meaning when you run the channel the other way.